Showing posts with label Windows 7. Show all posts

Old Windows Taskbar Restore in Windows 7

Microsoft's latest operating system, Windows 7, brings a slew of tweaks and improvements. While most adjustments are under the hood, the graphical user interface has received a facelift as well. One of the first changes you will notice is the revamped taskbar. Unofficially dubbed the "Superbar," this new feature is essentially a mash-up of the traditional Windows Quick Launch/taskbar and the Mac OS X dock.

Windows 7 Superbar

As it's often the case with any significant change in the way we use software, opinions will vary. While many like to stick to the "if it's not broken, don't fix it" philosophy, I happen to like the new taskbar a lot. Unfortunately for the those of you who don't, defaulting to the ways of old isn't as simple as unchecking Superbar in favor of Quick Launch, so you'll have to get a little hands-on. Keep reading to bring back the taskbar you're familiar with.


Start by right clicking the Superbar, mouse over Toolbars and click New toolbar. When prompted to enter a folder directory, paste the following string of text:

%userprofile%\AppData\Roaming\Microsoft\Internet Explorer\Quick Launch

Then click Select Folder.

A labeled Quick Launch bar should appear near the clock.

To configure the Quick Launch bar to how it was in previous versions of Windows, you'll have to make a few swift changes. Start by right clicking the Superbar and unchecking Lock the taskbar. You should see a few dotted lines appear near the Quick Launch bar.

Next, right click on the Quick Launch bar, uncheck Show text, and Show title. Then you'll need to right click on all your Superbar icons
and unpin them.

Grab the dotted lines near the Quick Launch bar and pull it all the way to the Start button. By doing so, the bar where your applications load will be bumped near the clock - so pull those dotted lines back to the left near your Quick Launch bar.

Now, your open applications will still be using Windows 7's small collapsed buttons instead of the long text-filled ones. To change that, right click on the Superbar and head into Properties.

Click the drop down menu next to Taskbar buttons and choose either of the last two options. When you're done, click Ok and recheck Lock the taskbar.

The finished product should look something like this:

Windows 7 using the traditional taskbar with quick launch buttons

Removing Windows 7 partition - For XP users

This process is essentially the same as before but using the third-party tool GParted instead of the integrated Disk Management utility in Vista. Be sure to have your XP CD on-hand to repair potential boot loader complications.

Before proceeding realize that by removing your Windows 7 installation and partition you will be deleting any documents
, pictures, videos etc. which you've accumulated on the Windows 7 partition if you haven't backed them up previously, so consider doing that before continuing.

Download the latest copy of GParted here, and then burn it to a disc as an image file.

After you've downloaded and burned your image of GParted, pop it in your optical drive and reboot. Shortly after booting off the disk you'll have to choose your preferred language, keymap and screen resolution.

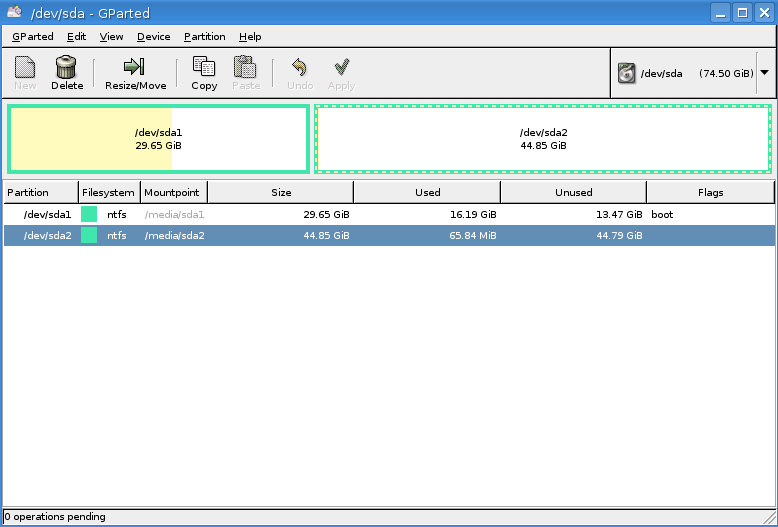
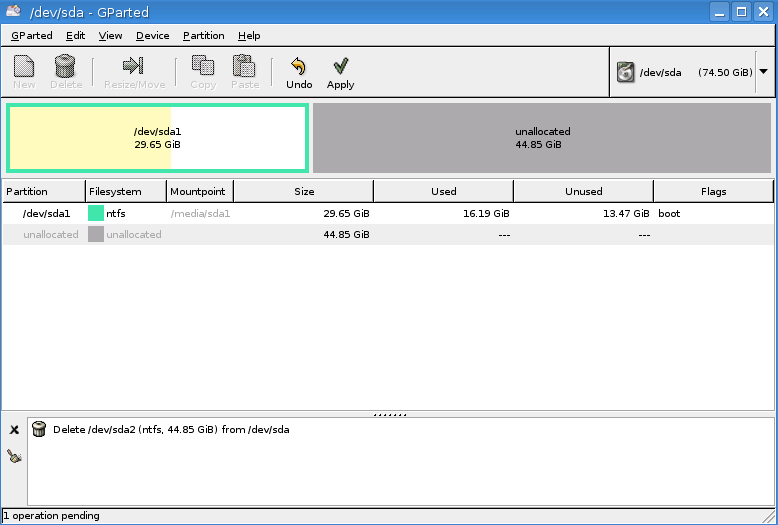
Once the partition software has loaded, right click the partition where Windows 7 resides (it's probably the second partition on “dev/hda1” if you followed our dual boot guide) and choose “Delete”.

You should now see unallocated space on your hard drive where Windows 7 once laid.

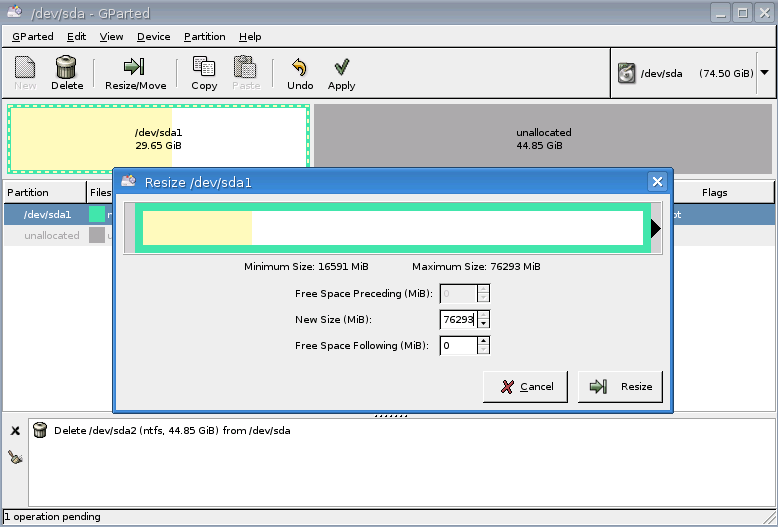
Right click your original (and probably only remaining) partition, choose “Resize/Move” and fill in 0 for both the free space preceding and following to occupy the entire unallocated space.

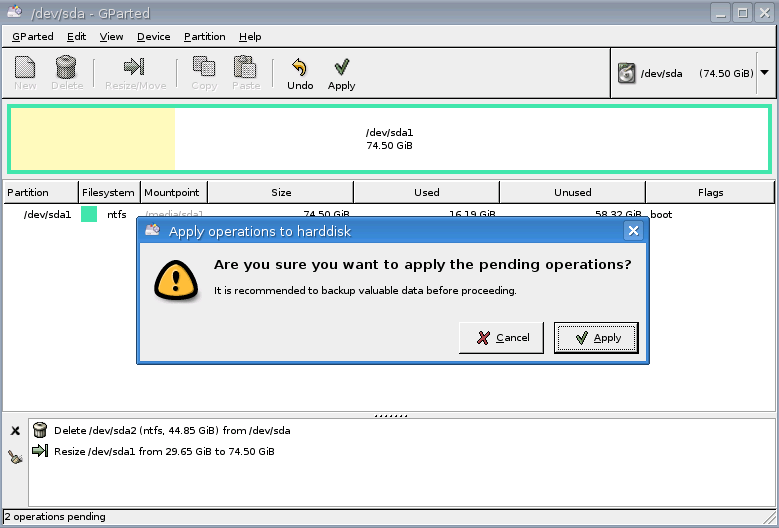
Be sure to click apply or all changes made thus far will not be put into effect.

Repairing XP's boot loader:
Now, at this point you may or may not be able to boot into XP as you've just potentiallybotched your boot loader - don't worry! Even if you can access XP but want to get rid of the OS selection during boot up, continue reading.

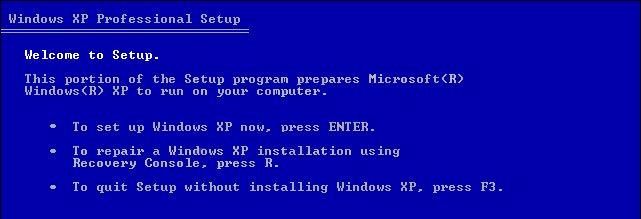
Boot using your Windows XP CD and after the initial loading process you should be met with three options: “Enter” to setup Windows, “R” to load the Recovery Console and “F3” to quit without doing anything, we want to hit “R” for the Recovery Console.

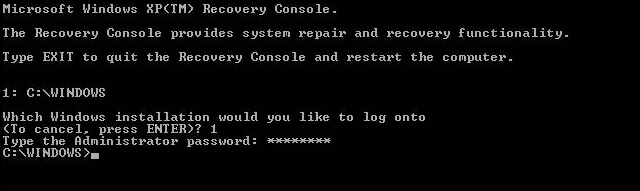
The Recovery Console will search for all instances of Windows and ask you to select one. Enter the number pertaining to your XP installation, and you'll be prompted for an Administrator password (if you're not sure what it is you likely don't have one, just hit enter).

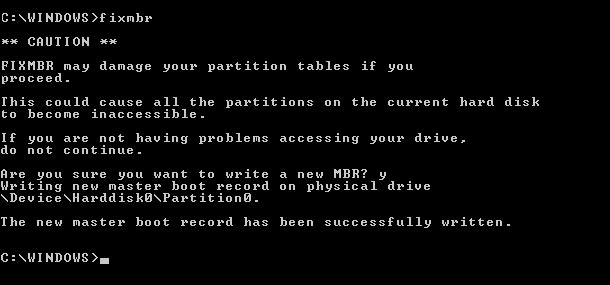
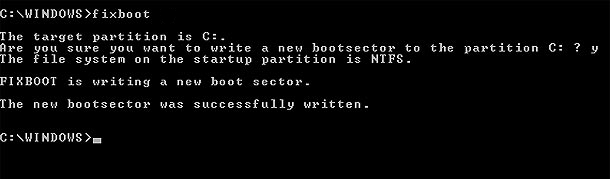
Now, enter “fixmbr” (confirm with “y”) and upon completion enter “fixboot” (confirm with “y”).

Enter “exit” to reboot your system, remove your XP CD and you should be good to go.


Know To Removing your Windows 7 installation, partition

Removing Windows 7 using Windows Vista:

Before we get started, if you prefer to use the GParted tool for any reason, feel free to do so, though it's not altogether necessary. Be sure to have your Vista DVD on-hand to repair potential boot loader
complications.

Before proceeding realize that by removing your Windows 7 installation and partition you will be deleting any documents, pictures, videos etc. which you've accumulated on the Windows 7 partition if you haven't backed them up previously, so consider doing that before continuing.

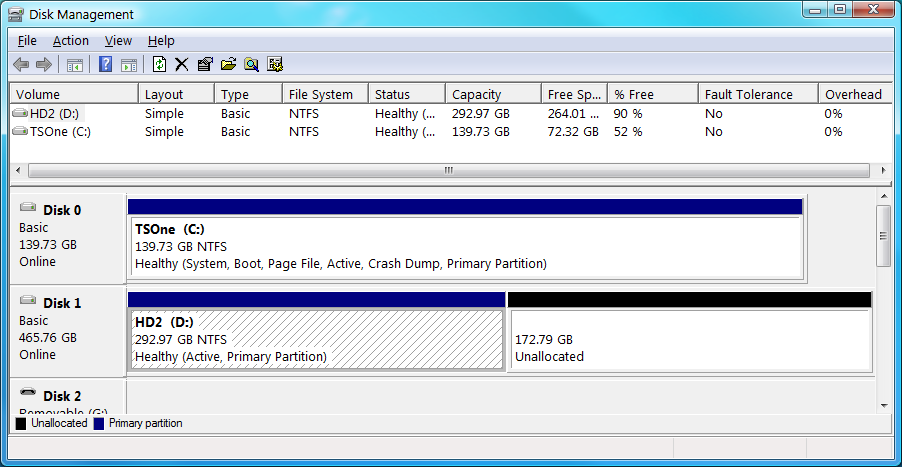
Once you are ready, boot up Vista, click the Start menu and enter “diskmgmt.msc” into the search bar. A window titled “Disk Management” should open displaying basic information about the drives attached to your PC.

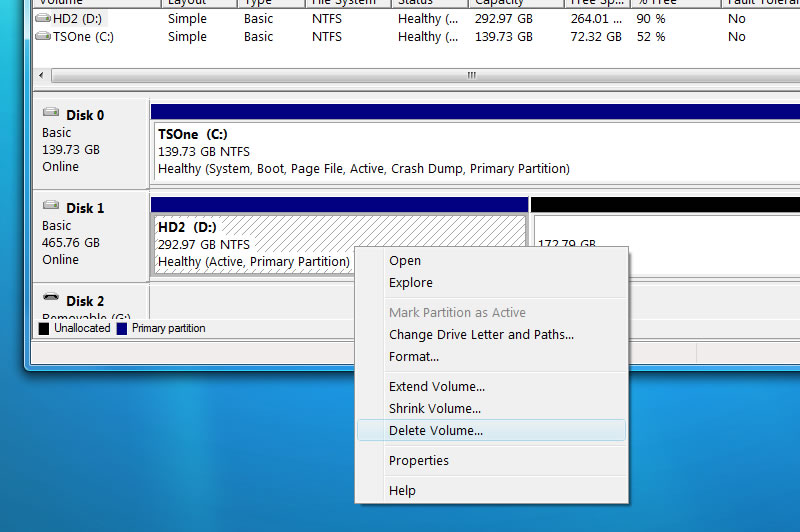
Right click the partition you previously created for Windows 7 (it's probably the second partition on “Disk 0” if you followed our previous guide) and opt to “Delete Volume...”.

You should now see unallocated space on your hard drive where Windows 7 once laid.

Right click your original (and probably only remaining) partition, choose “Extend Volume...” and enter the full capacity of the unallocated space.

Repairing Vista's boot loader:
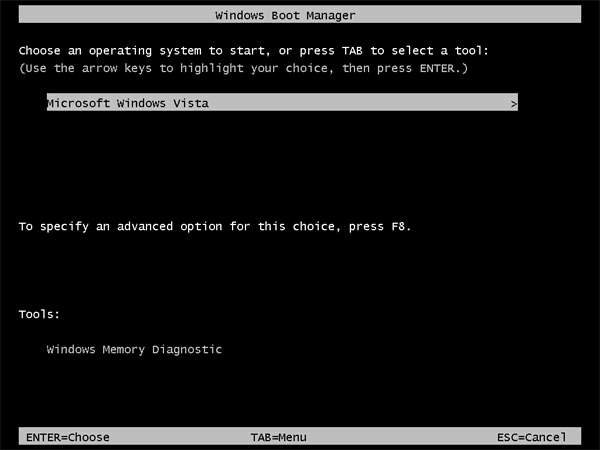
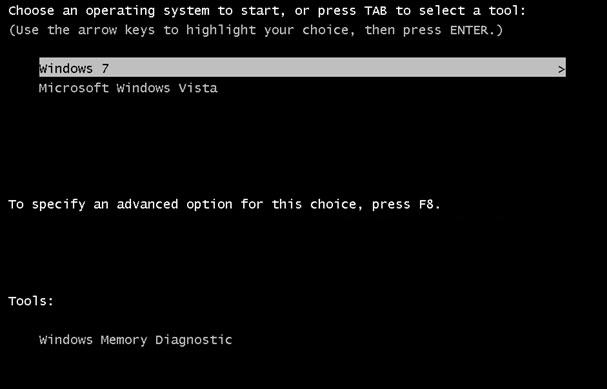
Now, at this point you may or may not be able to boot into Vista as you've just potentially botched your boot loader - don't worry! Even if you can access Vista but want to get rid of the OS selection during boot up, continue reading.

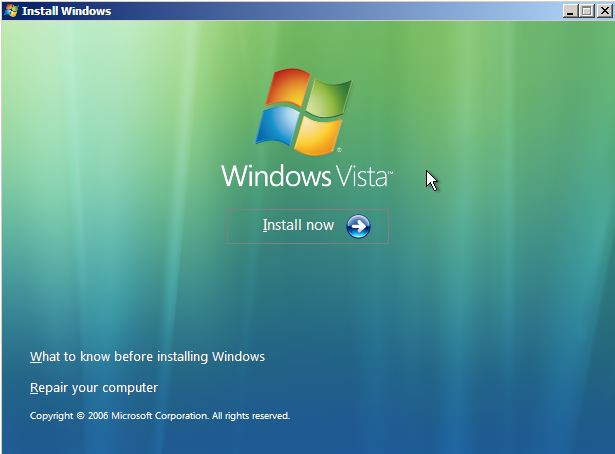
Break out your Vista DVD, boot off it and after the initial loading/configuration process you should be met with a screen with three potential options: “Install now”, “What to know before installing Windows” and “Repair your computer”, we want the third option, “Repair your computer”.

Select your Vista installation when asked what you'd like to repair.

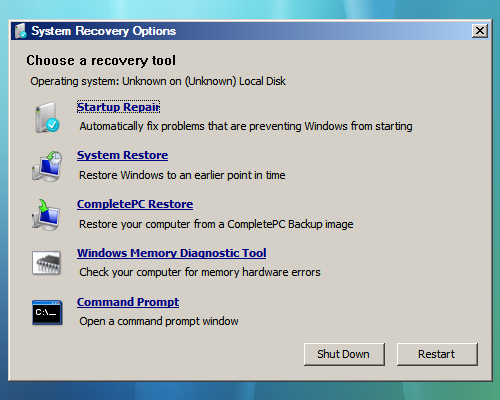
You'll then be asked to choose a recovery tool. We'll be going with the first one there, “Startup Repair”.

The recovery tool should now begin scanning for potential issues. Your system might reboot during this process. If you're prompted at some point for a System Restore, click Cancel.

Eventually the utility should proclaim the issues to have been resolved at which point you can boot normally and remove your Vista DVD from the drive.


Thats it....

Know About Windows PowerShell 2.0 & Windows 7


Powershell is a command-line shell utility and associated with scripting language from Microsoft. Power Shell supports Windows XP SP2/SP3, Windows Vista, Windows Server 2003, Windows Server 2008. The latest version of PowerShell is Windows PowerShell 2.0 released with Windows 7 and Windows Server 2008 R2. Microsoft Windows PowerShell is a new command-line shell and scripting language designed for system administration and automation. Built on the .NET Framework, Windows PowerShell enables IT professionals and developers to control and automate the administration of Windows and applications.


Remote management : You can run commands on one computer or hundreds of computers with a single command. You can establish an interactive session with a single computer. And, you can establish a session that can receive remote commands from multiple computers.

New cmdlets : Cmdlets are specialized commands in the PowerShell environment that implement specific functions. These are the native commands in the PowerShell stack. Windows PowerShell includes more than 100 new cmdlets, including Get-Hotfix, Send-Mail Message, Get-Computer Restore Point, New-Web Service Proxy, Debug-Process, Add-Computer, Rename-Computer, Reset-Computer Machine Password, and Get-Random.

Modules : Windows PowerShell modules let you organize your Windows PowerShell scripts and functions into independent, self-contained units. You can package your cmdlets, providers, scripts, functions, and other files into modules that you can distribute to other users. Modules are easier for users to install and use than Windows PowerShell snap-ins. Modules can include any type of file, including audio files, images, Help files, and icons. Modules run in a separate session to avoid name conflicts.


Windows PowerShell Integrated Scripting Environment (ISE) : Windows PowerShell ISE is a graphical user interface for Windows PowerShell that lets you run commands, and write, edit, run, test, and debug scripts in the same window. It offers up to eight independent execution environments and includes a built-in debugger, multiline editing, selective execution, syntax colors, line and column numbers, and context-sensitive Help.

Events : Windows PowerShell includes a new event infrastructure that lets you create events, subscribe to system and application events, and then listen, forward, and act on the events synchronously and asynchronously.

Advanced functions : Advanced functions behave just like cmdlets, but they are written in the Windows PowerShell scripting language instead of in C#.

Script internationalization : Scripts and functions can display messages and Help text to users in multiple languages.

Background jobs : With Windows PowerShell background jobs, you can run commands asynchronously and “in the background” so you can continue to work in your session. You can run background jobs on a local or remote computer, and you can store the results locally or remotely.

Debugger : The Windows PowerShell debugger can help you debug functions and scripts. You can set and remove breakpoints, step through code, check the values of variables, and display a call-stack trace.

Transactions : Windows PowerShell now supports transactions, which let you manage a set of commands as a logical unit. A transaction can be committed, or it can be completely undone so that the affected data is not changed by the transaction.

Dual Boot Windows 7 with XP/Vista in 3 easy steps

Now that Microsoft's latest operating system, Windows 7 (beta) is publicly available, almost everyone is itching to get their grubby paws on a copy and take it for a test drive.

However, because this is only a beta release most people simply aren't willing to part with their established installations of Windows Vista
or XP. With that mind, we're going to look at one easy way of dual booting Windows 7 Beta with either Vista or XP in three painless steps...

Step 1:
Create an Installation Disc
In case you haven't downloaded your copy of Windows 7 Beta yet, you can get it now in 32-bit and 64-bit flavors. You can read further instructions and get your installation key from Microsoft's website.

Once you obtain your copy of Windows 7 (the official release is an .ISO file), you will need to burn it to a blank DVD to continue.

There are countless applications out there which will burn image files, to name a few popular free ones:Burn4Free CD and DVD, CDBurnerXP, ImgBurn and Ashampoo Burning Studio Free. I used CDBurnerXP.

Step 2:
Create a New Partition
Moving on to more pressing matters, we'll need to create unallocated disk space by resizing an existing partition followed by creating a new partition on this unallocated disk space where Windows 7 will call home.
I imagine a majority of you will only have one partition, which is dedicated to whatever operating system
you're currently using.

To complete this task we'll be looking at two different approaches because while Windows Vista has built-in tools to resize active partitions, XP does not, and thus we must resort to a third party application (GParted).

Create a New Partition on Windows Vista
Before we get started, if for any reason you prefer to use the GParted alternative detailed below, feel more than welcomed to do so.

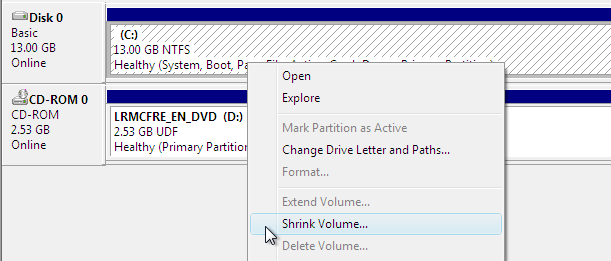
In Windows, click the Start button and enter "diskmgmt.msc" into the search bar. This will open a window titled "Disk Management" displaying basic information about the drives attached to your PC. Right click the partition on "Disk 0" and select "Shrink Volume".

This should present you with drive capacity information and the option to enter the amount you would like to "shrink" your partition by. The recommended minimum partition size for Windows 7 is 16GB, so enter an amount of that size or larger and then click "Shrink".

You should now see unallocated space on your hard drive in the capacity specified, situated just after your resized partition.

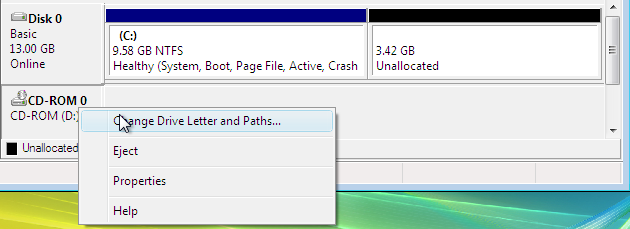
Before you create a new partition and assign a letter to it, be a perfectionist and reassign your optical drives to the next letter down from what they are now, so that your new empty partition can have whatever letter follows your first partition (probably "D").

Right click the newly unallocated space and select "New Simple Volume..." which ought to open a wizard screen.

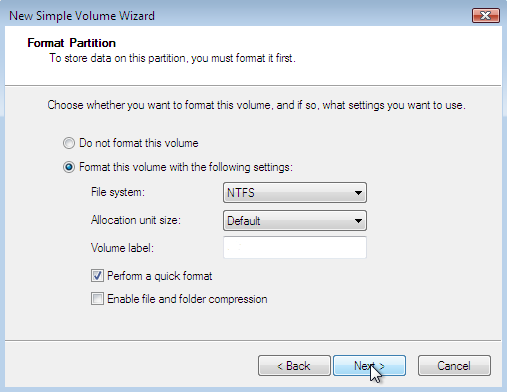
On your way through the wizard you'll be asked to define the capacity for your new volume. Let it occupy the entire size of the unallocated space and assign it the letter that you've just freed. Quick format the volume using the NTFS file system and default allocation unit size (Volume label can be anything, just name it Windows 7).


You should now see a healthy primary partition with the capacity and label you had defined, and with that you can move onto step 3.

Create a New Partition on Windows XP
This process is fundamentally the same as the above, but using the third-party tool GParted instead of the integrated Disk Management utility in Vista. Needless to say, this is the route XP users will have to take.

Download the latest copy of GParted and then burn it to a disc just like you did with the Windows 7 .ISO, except GParted can be fit on a CD.

After you've burned your image of GParted, pop it in your optical drive and reboot. Shortly after booting off the disc you'll see a dialog for choosing your preferred language, keymap and screen resolution.

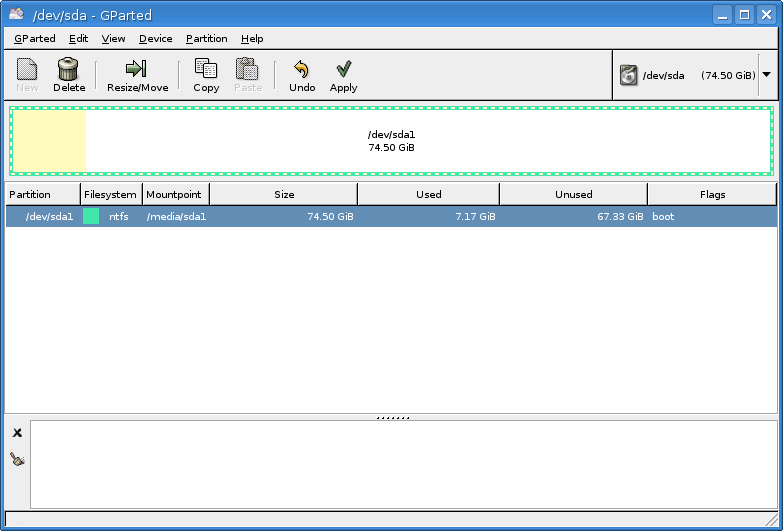
Once the software has loaded, right click the partition you're going to resize - again, you probably only have one and it's likely on "dev/hda1" - and select "Resize/Move".

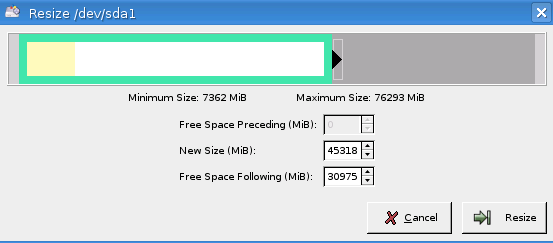
This should present you with drive capacity information and the option to enter a new size you'd like your partition to be. The recommended minimum partition size for Windows 7 is 16GB so opt for that size or larger.

You should now see unallocated space on your hard drive in the capacity specified, situated just after your resized partition.

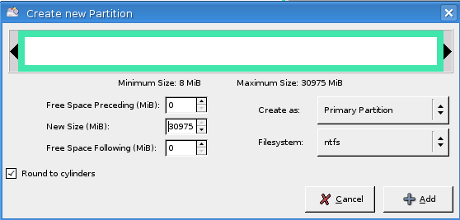
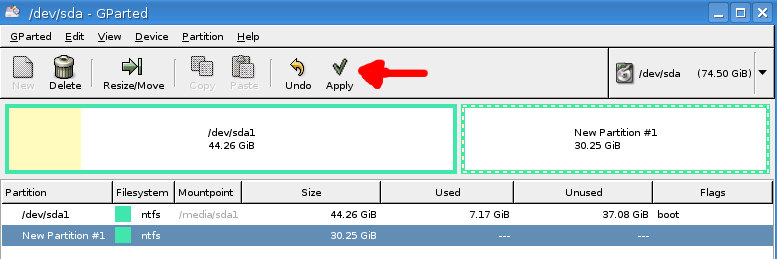
Right click the newly unallocated space and select "New", which ought to open a window requesting the amount of free space you'd like preceding and following the new partition as well as the new partition size. Fill in zeros for both the preceding and following free space in order to occupy the entire unallocated space. Create it as a "Primary Partition" and format it using NTFS.

You should now see a healthy primary partition with the capacity you defined above. Click Apply to initialize the operation. Once that's done you can now move on to step 3.

Step 3:

Install Windows 7
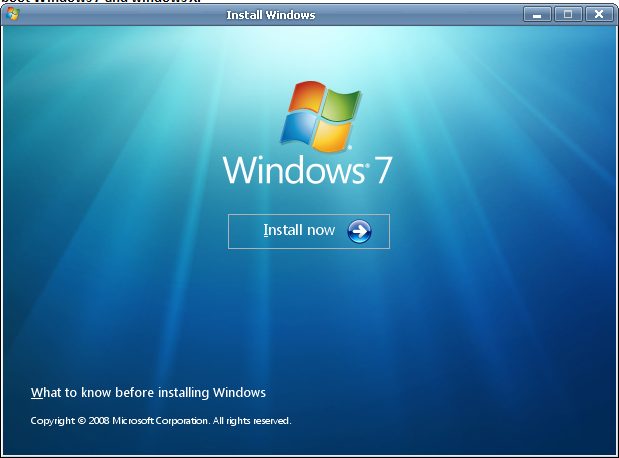
With the Windows 7 DVD in your optical drive, reboot and "press any key" to boot from the disc when prompted. The installation wizard that you'll meet is pretty straightforward for the most part.

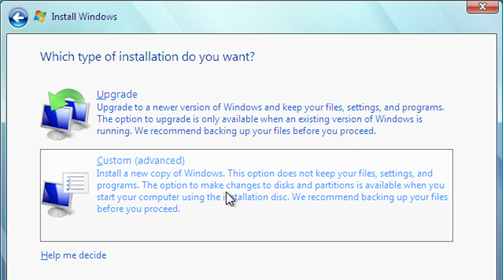
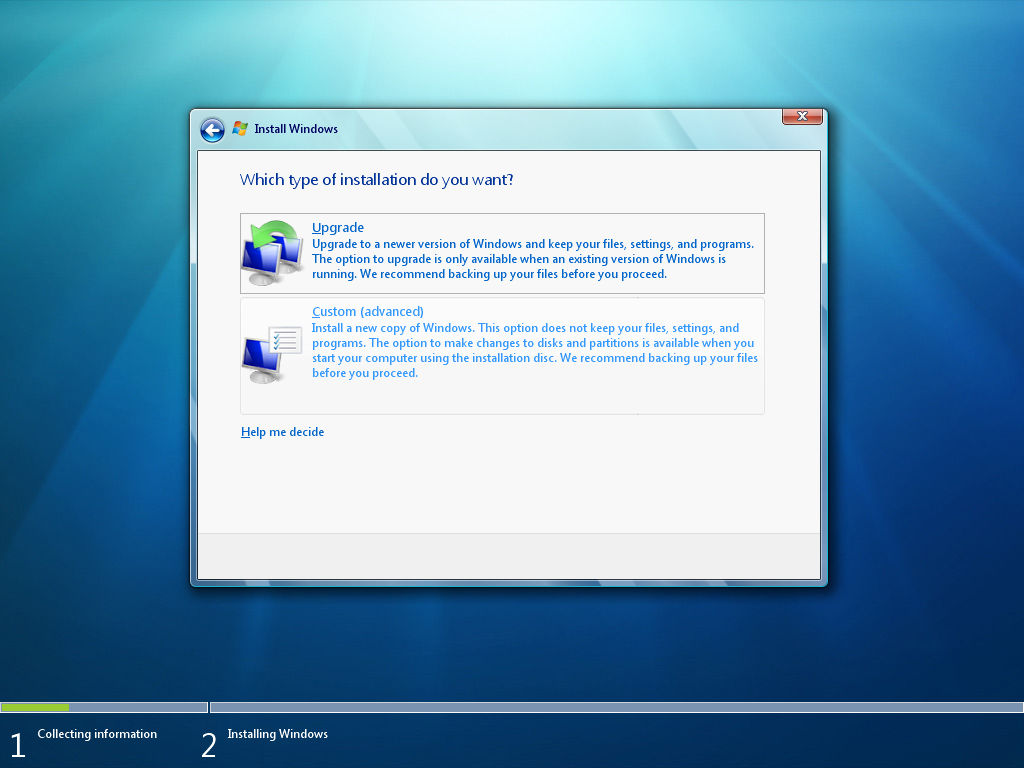
The only thing worth noting is that during the process make absolutely sure that you choose the "Custom (advanced)" installation option so you're able to select the fresh partition created above, and be careful, you run the risk of installing over your old operating system along with all of your data if you select the wrong partition.

After defining all configuration parameters Windows will continue with the installation process for roughly 15-30 minutes and then prompt you to set up your account, provide a key and set up Windows.

Pat yourself on the back! You've successfully installed Windows 7 alongside your previously existing instance of Windows and you'll be able to check out 've heard about Microsoft's latest operating system.


Troubleshooting Tips:

Make sure you shutdown/reboot your PC from within Windows cleanly if you're having issues when attempting to alter your partition with GParted.

Can't boot off the GParted or Windows 7 discs? Take a look in your BIOS to ensure that your boot sequence is configured properly. You'll want the optical drive to take precedence over your hard drives so you can boot off the CD.


General Windows 7 Shortcuts


With all the less pleasant verdicts about Vista, Windows 7 is perhaps PC users next best news. Codenamed Blackcomb, this new Microsoft operating system is surely a successor over it̢۪s predecessor Windows XP and definitely Vista. With Microsoft to end their support for Windows XP in 2014, we figured Windows 7 will be completely taking over things in the next year or so.

If you are a Windows users its probably time for a change, or at least tryout this new operating system. Here are some shortcut keys to help improve your productivity and user experience with Windows 7.


Shortcut     Description

Win + UP Arrow     Maximize the current window
Win + Down Arrow    Restore down or minimize current windows
Win + Left Arrow     Dock the current window to the left half of the screen
Win + Right Arrrow     Dock the current window to the right half of the screen
Win + [number]     Activate and run the program pinned on Windows 7 Taskbar, running program wont be affected
Win + Home     Minimize all but the current window
Win + Space     Makes all windows transparent so you can see through to the desktop
Win + Pause/Break     Open System Properties
Win + Tab     Flip Aero 3D [press Tab to cycle between Windows]
Win + B     Move focus to notification tray (the right-most portion of the taskbar)
Win + D     Show/Hide desktop
Win + E     Windows Explorer is launched
Win + F     Search
Win + G     Bring all gadgets on top and foreground
Win + L     Lock Computer
Win + M     Minimize all windows
Win + P     Open the projection menu (generally used for laptops connected to projectors)
Win + R     Run Command is launched.
Win + S     OneNote Screen Clipping Tool
Win + T     Show preview thumbnail of running applications in Windows Taskbar one by one without mouse over
Win + X     Mobility Center
Win + #     Quicklaunch
Win + =     Magnifier
Win + [+/-]     Enables the magnifier and zooms in/out
Win + Shift + Up Arrow     Maximize vertical size
Win + Shift + Down Arrow     Restore vertical size
Win + Shift + Left Arrow     Jump to left monitor
Win + Shift + Right Arrow     Jump to right monitor
Win + Shift + M     Undo all window minimization
Win + Shift + T     Cycles backwards
Win + Ctrl + F     Opens the Active Directory Find Computers dialog
Ctrl + Right Arrow     Move the cursor to the beginning of the next word
Ctrl + Left Arrow     Move the cursor to the beginning of the previous word
Ctrl + Up Arrow     Move the cursor to the beginning of the previous paragraph
Ctrl + Down Arrow     Move the cursor to the beginning of the next paragraph
Ctrl + Click     A pinned taskbar icon to cycle through the program’s open windows (e.g. IE)
Ctrl + Win + Tab     Persistent flip 3D
Ctrl + Shift with an arrow key     Select a block of text
Ctrl with any arrow key + Spacebar     Select multiple individual items in a window or on the desktop
Ctrl + Shift + Esc     Open Task Manager directly
Ctrl + Shift + N     Create new folder

install Windows 7 from a USB key


Microsoft's TechNet magazine has posted instructions on installing Windows 7 from a USB key - which will be very handy for anyone installing Windows 7 on a netbook, in particular.

Installing Windows 7 from a USB key will also be faster than installing it from DVD.

Dennis Chung, IT Pro Evangelist at Microsoft, posted a video explaining the process.

Here, according to TechNet, is what you need to do:

1. You should already have DiskPart installed on your Windows machine - you'll use this to prepare the USB drive. If this free disk partitioning app isn't already already installed, you can download DiskPart from Microsoft.

2. Launch DiskPart by typing diskpart into the Start search box.

3. Now run the list disk command to check the status of your drive.

4. Next, run select disk 1 where the "1" is actually the corresponding number of your USB drive.

5. Now run clean.

6. Once that's done, run create partition primary.

7. Now you can make the partition active by entering active.

8. Next, set up the file system as Fat32 by running format fs=fat32 quick.

9. Enter the assign command to give the USB drive a drive letter - this will make it easier to access from Windows Explorer.

10. Drag and drop the contents of your Windows 7 installation DVD onto the USB drive to copy the files across.

11. Stick the USB key drive into the machine you want to install Windows 7 onto and boot the system from the drive. The Windows 7 installation will now begin.

How to Customize Windows 7 Logon Screen Text For Windows 7

As we have said in past Rafael Reviria has been source of many interesting finding in latest Microsoft operating system windows 7. It was Rafael who has found how to customize Windows 7 Logon background screen. Once again here is yet another interesting find from winthinwindows.

With ability tochange Windows 7 Logon background it may happen that a light background wallpaper making difficult to read username text on logon screen. Well don’t worry it seems Microsoft has already provide workaround to over come from this issue.

Here is simple registry hack to make Windows 7 Logon Screen Text & Button

How to Customize Windows 7 Logon Screen Text

1. Press Win+r and Type Regedit on run command

2. Navigate to following registry key

HKLM\SOFTWARE\Microsoft\Windows\CurrentVersion\Authentication\LogonUI

3. In right-side pane, create a new DWORD value nammed ButtonSet and set its value to any of following according as per your requirements:

0 - Lighter text shadows, darker (more opaque) buttons (Windows default)

1 - Darker text shadows, lighter (more translucent) buttons (for lighter backgrounds)

2 - No text shadows, opaque buttons (for darker backgrounds)

Windows 7 Logon Screen Text
Image Credit: Withinwindows.com

Dual boot Windows 7 and windows XP-install

To make windows dual boot Windows 7 and Windows XP, first step you must prepare Hardisk partition minimal 10GB for windows 7. You can create partition using EASEUS or partition magic or other. Note, backup your data before doing this. After all partition ready, now follow the following steps:

  • Insert Windows 7 DVD to your DVD Drive. (Note: I Install windows 7 from windows XP desktop). After this windows appear click install now.
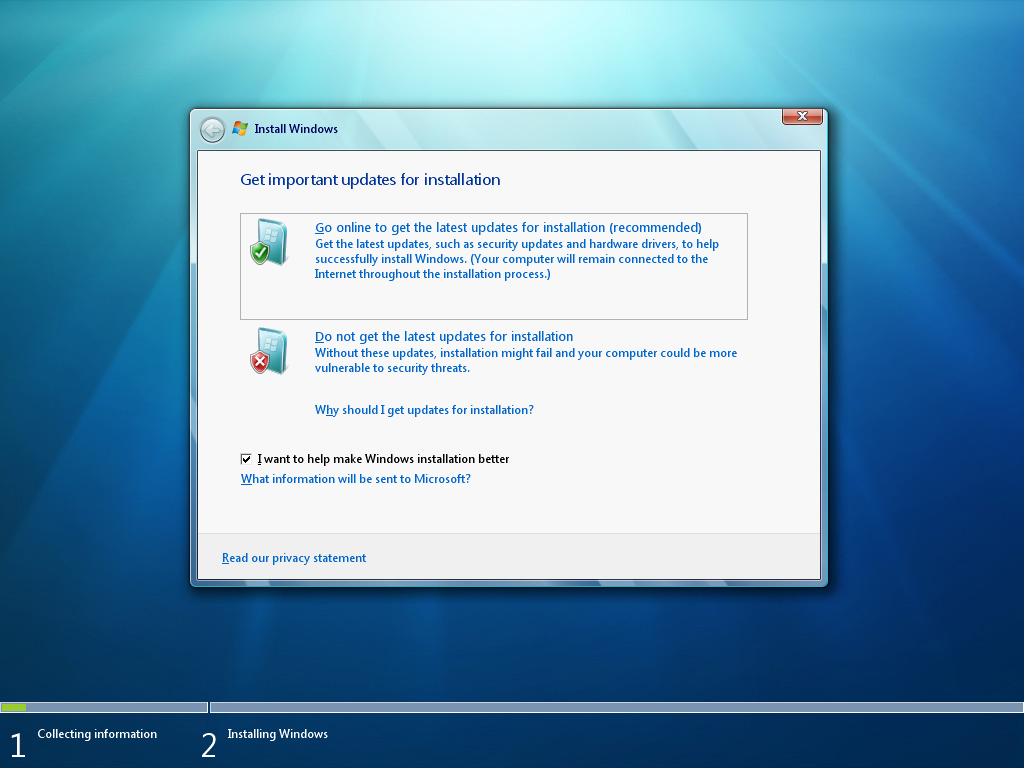
    • Select one of two choices. If your computer not connect to the internet don’t click get the latest updates.

    • Select Custom on type of installation

    • Select partition where you will install Windows 7 (e.g. drive C: for windows XP and drive D: for windows 7), then click next.

    • Following installation process till finish, if windows 7 ask the serial number, enter your Windows 7 serial number.

10 questions to consider when planning a Windows 7 upgrade

By Debra Littlejohn Shinder, MVP (Enterprise Security)

Windows 7 hasn’t even been released yet, but the buzz around it indicates that many individuals are chompin’ at the bit to upgrade as soon as it hits the market.

Despite this enthusiasm, however, much has been made of a recent survey by Dimensional Research. According to the survey, 84% of 1,100 IT professionals surveyed said they don’t plan to upgrade to Windows 7 in the next year, 16% do intend to upgrade in the next 12 months, and 42% expect to upgrade within 12 to 24 months. In addition, 43% said the current economic downturn is one of the reasons they will delay upgrading to Windows 7. That would seem to indicate that improvement in the economy over the next year might change the upgrade numbers. It’s also possible that this month’s discontinuation of mainstream support for Windows XP, which most of the companies are currently using on the desktop, may influence some to upgrade more quickly than they might otherwise.

Sooner or later, it’s likely that most home users and businesses will be upgrading from their current operating system to Windows 7. In this article, we’ll address 10 things you should keep in mind when you begin planning an upgrade to Windows 7.

Do I need to buy new hardware?

Many people equate upgrading the operating system to the need to buy a new computer or, at the very least, add RAM and perhaps a bigger hard drive to their present systems. That’s because traditionally, each new version of Windows has needed more disk space and memory than its predecessor.

Will you need to buy new hardware if you want to use Windows 7? That depends. Microsoft’s recommended hardware specifications for Windows 7 Release Candidate include a 1 GHz processor, at least 1 GB of RAM, DirectX 9.0 support, 16 GB of free disk space, and 128 MB of graphics memory (for Aero). Those requirements are pretty much the same as the published system specs for Vista Home Premium/Business/Enterprise/Ultimate (the only difference is that the Vista specs list 15 GB of disk space). Many beta testers report that Windows 7 runs faster on their low-powered machines (512 MB of RAM) than does Vista.

Rule of thumb: If your computer is powerful enough to run Vista acceptably, it will probably run Windows 7 as well or better. If you’re currently using XP on a computer with less than 512 MB of RAM or a processor that’s slower than 800 MHz, you’ll need to upgrade your hardware.

Can I upgrade directly from XP?

Many folks who are still running Windows XP want to know whether they can upgrade to Windows 7 without losing all their preferences and settings. The answer is, well, sort of. Microsoft is not providing a direct upgrade path from Windows XP to Windows 7. An in-place upgrade is available only if you’re running Vista SP1 or later. If you’re running XP, even if your hardware is sufficient, you’ll have to do a clean installation of Windows 7. However, you can use the Microsoft Deployment Tool 2010, which includes the User State Migration Tool, to transfer your user settings for the desktop and applications to the new Windows 7 installation. This article offers more details.

Can I do a Vista in-place upgrade?

If you’re running Windows Vista, note that you must install SP1 or SP2 before you can do an in-place upgrade to Windows 7. If you try to upgrade a Vista computer that doesn’t have a service pack installed, you'll get a message informing you that “to upgrade to Windows 7, the computer needs to be running Vista with Service Pack 1.”

Can I upgrade from Windows 7 beta to final release?

1 1

2

3

Many people are currently running either the public beta of Windows 7 (build 7000) that was released in January or one of the subsequent builds that has been leaked to various peer-to-peer sites since then. Many of them are wondering whether they’ll be able to do an in-place upgrade to the RC and/or final release.

Microsoft has recommended that beta testers go back to Vista and upgrade from it to the final release, but that’s something many will resist. Another option is to do a clean install, but again, many folks are using Windows 7 now on their mission-critical desktops and notebooks, and they don’t want to have to start all over. In deference to them, Microsoft representatives have said that it will be possible to upgrade from the beta, but it won’t be easy; it will involve a number of steps. The installer will tell you “no” when you attempt to do an upgrade from an earlier build of Windows 7. There's a procedure to bypass the version check so you can do the upgrade anyway.

Microsoft asks that you do this only if you “absolutely require” it. It’s likely that you’ll have a much more stable OS if you do a clean installation.

Will there be driver compatibility issues?

A big complaint about Windows Vista was driver incompatibility. Too many people upgraded their OS from XP to Vista only to find that a favorite peripheral, such as a printer or scanner, would no longer work. Vista also introduced a new display driver model, WDDM, which required video card vendors to write completely different display and video miniport drivers. And security enhancements in Vista affected how the OS handles drivers. Even though Vista was in development for five years, many hardware vendors did not have Vista drivers ready for all of their products when the OS was released.

Now that Vista has been out for more than two years, most hardware vendors have updated their drivers to work with it. Because Windows 7 uses the same driver models as Vista, the vast majority of hardware devices that work with Vista will work with Windows 7. For Vista drivers that won’t install on Windows 7, you can usually solve the problem by installing in Compatibility Mode. To do this, right-click the driver’s setup file, select Properties, click the Compatibility tab, enable compatibility mode, and select the appropriate operating system from the drop-down box.

Will there be application compatibility issues?

As with drivers, most applications that run on Windows Vista will run on Windows 7. You may need to enable Compatibility Mode on some applications, as described above. Interestingly, some applications that ran on XP and would not run on Vista will run on Windows 7. Microsoft reported in March that it had identified at least 30 old applications that will run on Windows 7 although they failed to do so on Vista. These are being referred to as “rescued applications.”

What if I have apps that won’t run on Windows 7, even in Compatibility Mode?

There may be some XP applications that you can’t get to run on Windows 7, even using Compatibility Mode. In the past, that might have been considered a reason not to upgrade. However, you may still be able to enjoy all the benefits of Windows 7 without giving up your favorite apps, thanks to a new compatibility feature called XP Mode. XPM is a host-based virtualization solution that will reportedly be made available at no cost to users of Windows 7 Professional, Enterprise, and Ultimate editions.

XPM includes a fully licensed copy of XP that runs in a virtual machine on your Windows 7 computer. This differs from just installing XP on Virtual PC or VMware. The virtualized applications appear like local applications on the Windows 7 desktop because they're published to the Win 7 host operating system. With XPM, you will be able to run any XP application on Windows 7. For more information about XPM, see Paul Thurrott’s blog post on the issue.

Should I wait for Windows 7 release to buy a new computer?

Some individual computer users may be wondering if they should wait until Windows 7 is released to buy a new computer, to ensure that the system will work with the new OS. An advantage of waiting is that after Windows 7 is released, you’ll be able to buy a computer that has it preinstalled, so you won’t need to upgrade.

However, if you need a new system now, there is no need to suffer with an outdated, slow, or defective system. A Vista system purchased now will in all likelihood run Windows 7 with no problems. But even though you don’t need to wait until the final release, you might want to wait until June 1 to make your purchase. Buying a Vista system after that date will make you eligible for a free Windows 7 upgrade license. (This applies to Vista Home Premium, Business, or Ultimate editions.)

Which edition of Windows 7 should I choose?

A big complaint about Vista is that there are too many editions to choose from. Windows XP offered only two retail editions: Professional and Home. (XP Media Center edition and Tablet PC edition were available only to OEMs.) But Vista offers a large and sometimes confusing array of options: Home Basic, Home Premium, Business, and Ultimate. (Starter is available only in “emerging markets,” and Enterprise is available only to volume licensing customers.)

Windows 7 will also have both Home Basic and Home Premium editions. The equivalent of Vista Business edition will revert to the Professional moniker. As far as we can tell, Enterprise and Ultimate editions will be the same, except that the former is sold only through volume licensing. There will also be a Starter edition, which will be installed on low-powered netbooks.

A major change is that each successive Windows 7 edition will include all features of the lower cost ones. Many Vista Business and Enterprise users were annoyed that they didn’t get Windows Media Center, DVD Maker, and other consumer-oriented features that came in Vista Home Premium. Since Home Premium couldn't join a domain and lacked support for EFS and some other business-oriented features, if you wanted both, you had to buy Ultimate. Windows 7 Pro will include everything that’s in Windows 7 Home Premium, and Enterprise will include everything that’s in Business edition. Companies will be able to easily block the consumer features when they deploy Pro (or Enterprise) on their networks.

Most people will find that either Home Premium or Pro will fit their needs. If you need BitLocker or the ability to boot from a VHD, you’ll want Enterprise or Ultimate.

What are the main reasons to upgrade to Windows 7?

Why upgrade to Windows 7 rather than stay with Windows XP or Vista? If you’re still running XP, an important consideration is the fact that Microsoft ended mainstream support for XP on April 14. Although critical security updates will still be provided at no cost until 2014, additional support is provided only to customers who pay for a support contract with Microsoft.

Windows 7 also provides the improved graphical user interface (Aero) you get with Vista. Search is improved, and consumers with children will appreciate the parental controls feature. The most important reason to upgrade from XP is security; both Vista and Windows 7 provide much better security.

If you’re using Vista, some of the new features and functionality you’ll get with Windows 7 include a more streamlined GUI with a more functional taskbar that features Jump Lists; new and more sophisticated versions of Paint, Wordpad, and Calculator; easier windows management with snap-to docking; elimination of the sidebar (while maintaining support for gadgets); and new built-in troubleshooting tools. While Windows 7 still focuses on security, User Account Control (UAC) is far less in your face and more user-configurable than in Vista. Windows 7 also has built-in support for touch (if you have a touchscreen monitor). Keyboard fans will find a number of new keyboard shortcuts to help you avoid use of the mouse in many situations.

For administrators, Windows 7 offers new tools such as PowerShell v2, improved Group Policy, and VHD image management and deployment.